Wednesday, September 9, 2009

20 More Useful Adobe Illustrator Menu Tips

We have seen many useful tips on Illustrator’s menu commands by talented designers before. Here are some more! Some of these were mentioned earlier too, while some are really helpful and less common. Let’s have a look!

1. Document Setup

Switch instantly to document size and unit preferences by using Command + Alt + P.

2. Paste in Back (Command + B).

This command is useful when you try to give a drop shadow effect to a text or an object. Generally we paste in front, and then send it back. Next time, use Command + B to paste in back directly; and assign a dark color for the shadow.

3. Quick Spell check

While working with the text objects, you can check the spelling instantly by pressing Command + I. This saves you time from opening a text editor and checking the text for spelling.

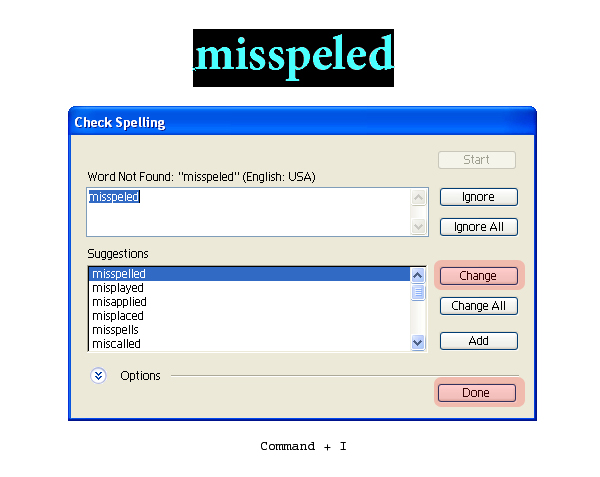
4. Hide/Unhide Objects

For messy artwork with lot of objects, hide unwanted objects by using Command + 3. Unhide all using Command + Alt + 3. This is similar to Lock/Unlock with invisibility.
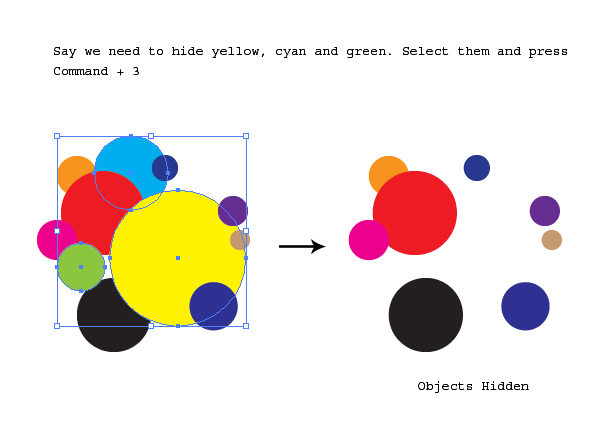
5. Lock/Unlock

Avoid accidental dragging of objects by locking them using Command + 2. Unlock them all using Command + Alt + 2

6. Threaded Text

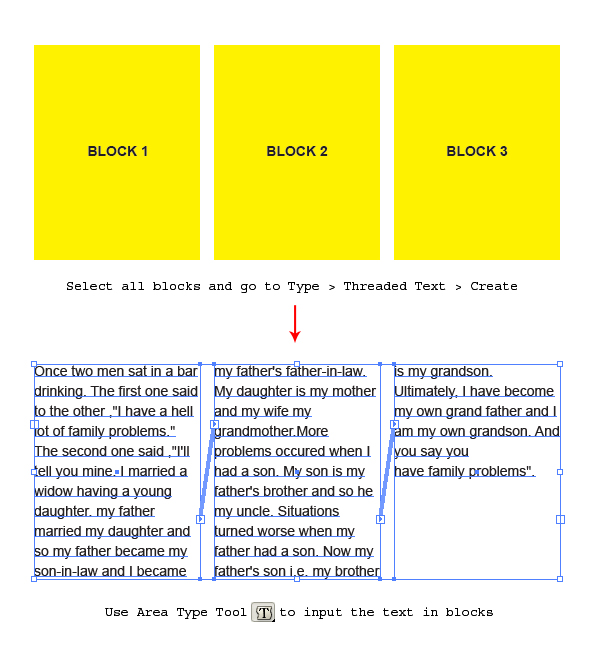
While creating brochures, manage the bulk of text in different blocks by using threaded text. It adjusts the text flow in all blocks/columns as you append or modify it. To achieve this, make the block shapes, select them all and go to Type > Threaded Text > Create. You can use the Area Type Tool to feed the text inside.
You can show/hide those messy text threads using Command + Shift + Y.

7. Change Case

This option is useful when you want the entire text in upper, lower, title or sentence case. Select the text and go to Type > Change Case. Assign the case you want.

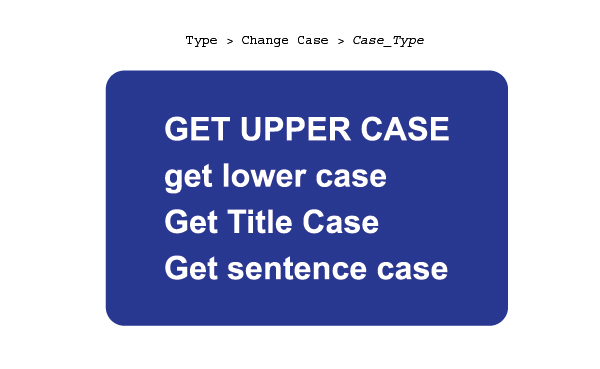
8. Show Hidden Characters

This command shows the returns and spaces in a text block so that you know if you have placed multiple returns by mistake, and are not able to see due to uneven line height of the text block. Select the text body and go to Type > Show Hidden Characters (Alt + Command + I)

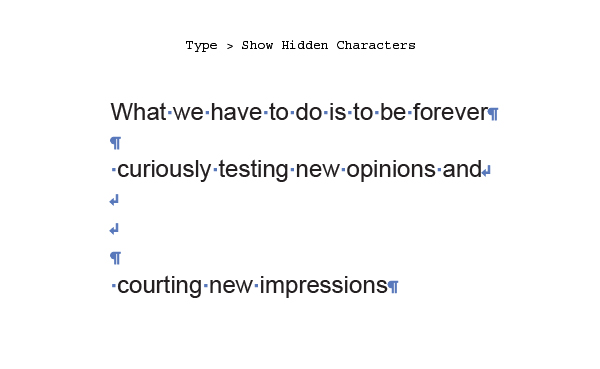
9. Hanging Punctuation

Use Roman Hanging Punctuation and Optical Margin Alignment for better appearance of text blocks with quotes and hyphens. For Roman hanging Punctuation; Select the text lines or block and select Roman Hanging Punctuation from the Paragraph panel menu.
Optical Margin Alignment: This option hangs the edges of letters like A and W slightly outside the text block, so that they look more balanced and aligned. To apply this, select the text and go to Type > Optical Margin Alignment.

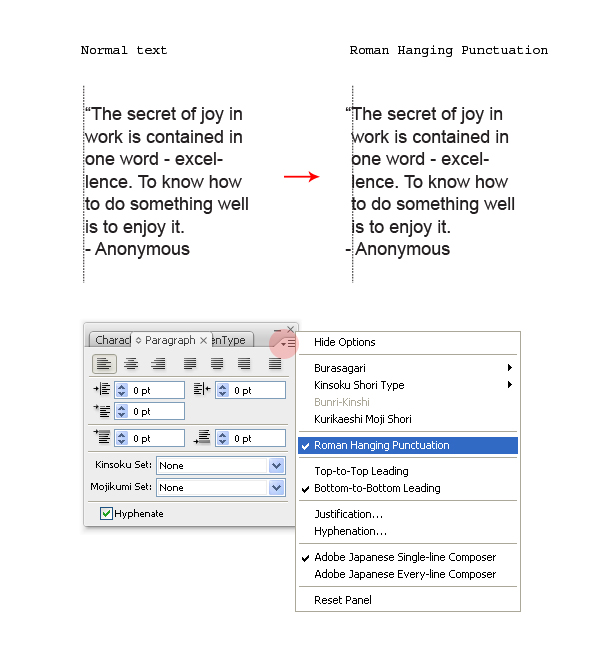
10. Show/Hide Bounding Box

When the objects are too small, say 2px size; it becomes annoying when you try to drag them with the selection tool; just because of the bounding box that forces you to scale or rotate the object. You can instantly hide the bounding box using Command + Shift + B and toggle using the same command.

11. Zoom for 3-D objects

While zooming in or out for 3D objects, it takes a lot of time if you do this operation with Command ++ or Command--. Instead, you can use the zoom level located at the lower-left corner of the main window. Say, you want to switch from 30% to 400% in one step. Here, the zoom level will really help instead of Command++ where you have to zoom 8 times to reach from 30% to 400%.

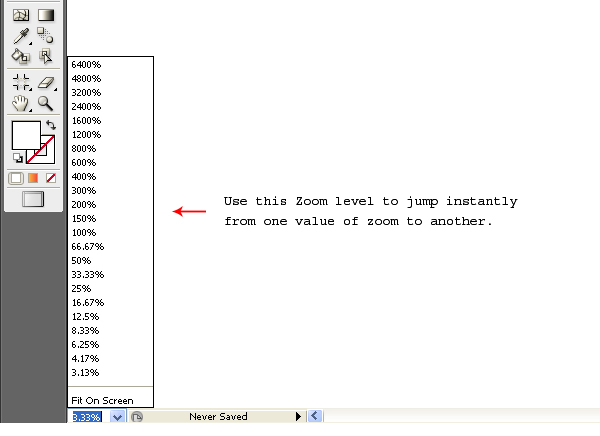
12. Toggle Between Stroke and Fill color

Use "X" to toggle between Stroke and Fill. Use Shift + X to swap the Stroke and Fill color.

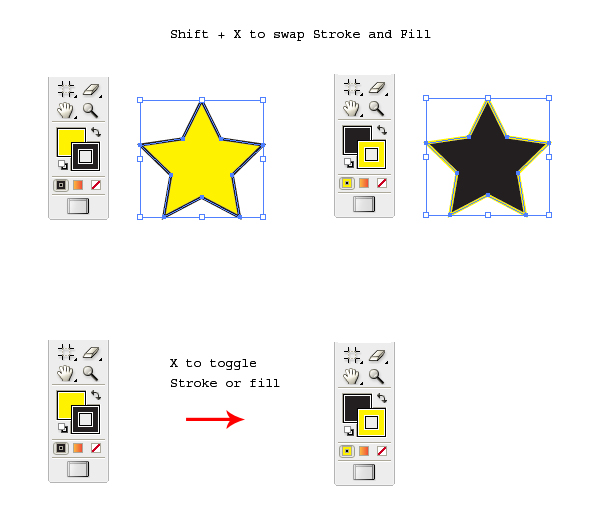
13. Create Crop Marks

Crop marks helps you identify where you want the printed work to cut or trim. To apply, select the object and go to Filter > Create > Crop Marks.

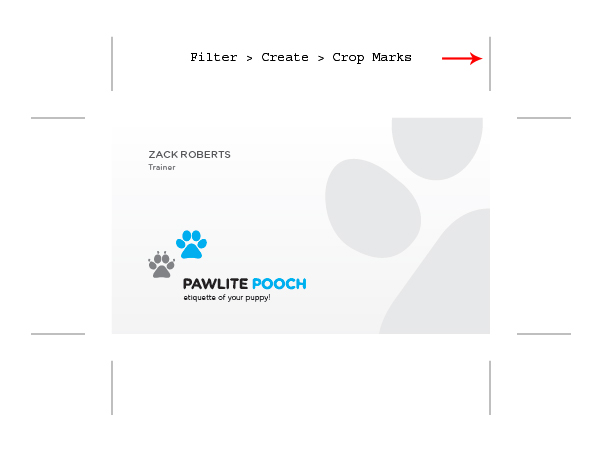
14. Customize Smart Guides

Smart Guides help you snap, align, create and edit objects relative to other objects. Use Command + U to enable Smart Guides. You can customize the snapping angle of your choice using Edit > Preferences > Smart Guides & Slices. In the Custom Angle option, specify the angles of your choice. This option is revolutionary when you are working with perspective.
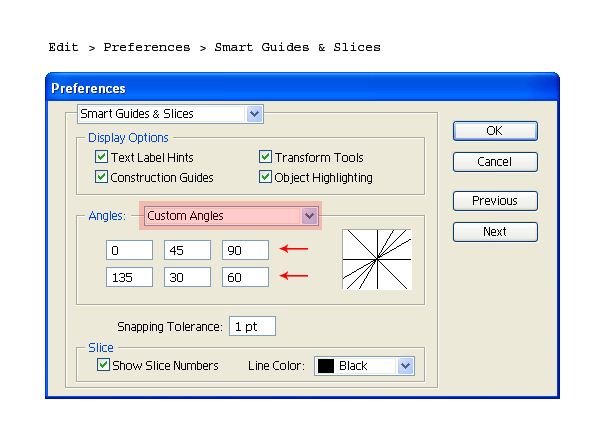
15. Managing Views

This is extremely helpful when you are creating a Map diagram of fairly large size. Say, we are illustrating a World Map and want to switch the view from Japan to South Africa instantly. Generally, we will drag the entire art work with hand tool until we reach our destination.
Instead, save these views with different names using View > New View option. So that, next time when you want to switch over to South Africa, just click View > South Africa. This works similar to a navigator.

16. Appearance of Black

We all are familiar with Rich Black and Normal Black. By default, Illustrator displays and outputs all black as rich Black. If you want to clearly differentiate Rich and Normal black for screen view and for printing, use Edit > Preferences > Appearance of Black. Select “Display all blacks accurately” from the dialog box. Next time, you will see Rich as Rich and Normal as Normal.
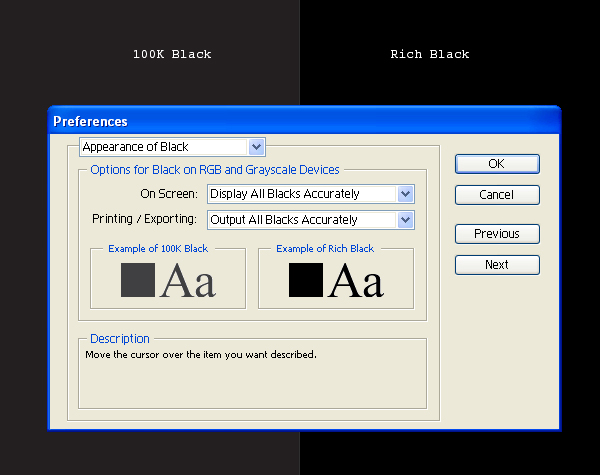
17. Replace Spine

You can tween blended objects on customized paths using Replace Spine option. To apply, select the blended result along with the spine path and go to Object > Blend > Replace Spine. The blended objects will tween along the spine locus.

18. Save Selection

This option is helpful when you want the objects to be moved together, but also need the freedom to modify them separately. For this, select the objects and got to Select > Save Selection. Next time, just click on Select > Selection_name and all your desired objects will be selected.

19. Support for Arabic Languages

Although, Illustrator has got Asian Language support, sometimes a US based Illustrator version might not display Arabic language correctly. For this, type the desired Arabic text in Inkscape and export the converted paths as .eps files to Illustrator.

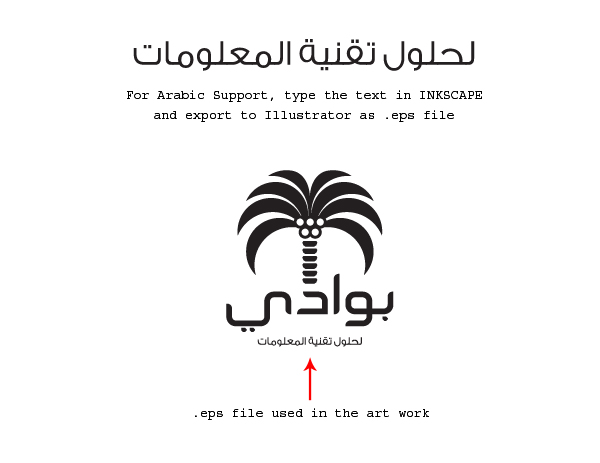
20. Switching from Illustrator to Corel Draw

Sometimes Corel Draw doesn’t allow us to import .AI files due to some missing plug-ins. In such case, export your artwork as .WMF (Windows Meta file) from Illustrator. Before exporting a .WMF file, enlarge your artwork to almost 1200% larger size. After successful import in Corel, again resize it back to the original size.
This is done for a reason; the small objects with fine curves are treated as distorted polygonal shapes in the output. So, it will be good if the size of the objects is fairly large while exporting. The .WMF files containing gradients are rasterized while importing in Corel; so remove the gradients while exporting. You can re-color them in Corel Draw.

Conclusion

The tips discussed in this tutorial are a brief round up of the Illustrator menu commands which can really boost up our performance with respect to time and quality. Hope you enjoyed them!

66 Outstanding Lightwave Tutorials

Heads up people, we got a huge roundup today. So big in fact, that it took me two whole weeks to get this one done. That's right, I've gathered up 66 of the very best Lightwave tutorials form around the net for your viewing pleasure. So grab a box of poptarts, and a case of cola, cuz man.....you're gonna be here a while.
PG

Author: Topher Welsh

Making of Moria Orc

Watch the modeling of the head of a Moria Orc from Lord of the Rings.

Making of The Patient

Check out the working practices and techniques of "Ten24" to create The Patient.

Making of The Arrival

Watch the creation of The Arrival using Lightwave, Fprime, and Maxwell Render.

Realistic Lighting Rig

Learn how to create a lighting rig that will simulate real life daytime lighting conditions.

Creating Lightsabers

Make lightsabers within Lightwave...with some help from After Effects.

Modeling a Soccer Ball

Learn how to model a basic low and high poly soccer ball.

Basic Modeling Walkthrough

In this huge 25 part tutorial you will learn many modeling techniques as you create a detailed portrait bust.

Les Paul Guitar

Learn how to model and texture a Les Paul Standard in Lightwave.

Advanced Glass Surfacing

Using the gradient function, "thickness", and HDRI as reflection/ refraction environments, create a realistic looking glass surface texture.

Character Rigging

This is a beginner level character rigging tutorial, in which you will learn to draw skeletons with attention to smooth deformations.

Hypervoxels 2.0

Explore the various functions of Hypervoxels 2.0.

Cartoon Elephant

In this two part tutorial, you will learn how to model a cartoon elephant from reference skethches.

Chromatic Aberration

Learn how to create chromatic aberration on an image using HDRIs.

Simple Clouds

Learn some simple parameters for making realistic clouds.

Complete Character Modeling Series

With 58 parts and over 80 pages of courseware, this free series will get you up to speed on Character Modeling in no time...well, as long as it takes to go through 58 parts anyways.

Compositing with Lightwave

Learn some compositing techniques to use within Lightwave.

Corrective Morphing

This tutorial will teach how to quickly and easily use Endomorphs to correct skin weighting.

Create An Army of Running Bipeds

Learn how create a group of animated biped characters that will carry out a linear movement on a flat plane.

Subpatch Modeling

Use supbatch modeling to model a character while using the "from down" technique.

Jack Daniels Bottle

Learn how to model, surface, and light a Jack Daniel's bottle in this awesome tutorial by Philip Meyer.

Making of i.2k3

Check out this interview with Pascal Beeckmans about his work on i.2k3, and then watch his workflow in creating this awesome piece of art.

Realistic Surfacing: Specular Highlights

Create photorealistic specular highlights for porcelain, glass, metal, and other hard and smooth surfaces.

Import Biped Animation From 3ds Max to Lightwave

Learn how to export and import animations from 3ds Max's CharacterStudio using the FBX format.

Talking Heads

Read about the basics of making talking head animations for use in games or movies.

Simple Marching Army

Make a huge marching army animation with 100 moving figures, using only 2 morph targets.

MD3 Rigging and Export

Here are some tutorials for character setup and export to MD3 Format.

Pose to Pose Animation

This is an article on how to make pose to pose animations with organized keyframing. Here's another tutorial on "Taking it to the Next Level".

The Zen of Lead and Follow

Check out this article/ tutorial on the context of animating forces instead of forms.

Poser Figures to Lightwave

Learn how to get Poser figure files into Lightwave for compositing and animation.

Ringed Planets

Make some cool looking ringed planets using spheres, disks, and image based texture maps.

Tumbling Objects

Learn how to make objects have a gentle tumbling roll.

UV Texture Mapping a Head

Learn how to UV texture map a head

Creating a Winter Landscape

Create an awesome looking winter landscape with only a basic knowledge of how Lightwave works.

Dinosaur Modeling

Learn how to model a dinosaur from reference.

Space Explosion

Combine hypervoxels, procedural textures, particle systems, volumetric lights and lens flares, to make an awesome space explosion scene.

Dynamics in Lightwave

Learn about the basics of dynamics inside of Lightwave with Mike Pauza.

Transport Ship Modeling

Model a transport ship in Lightwave in this huge 5 part tutorial with Larry Shultz. Part 1 Part 2 Part 3 Part 4 Part 5

Growing a Vine

Learn how to dynamically grow a vine.

Abstract Art

In this huge 6 part tutorial, Tim Dunn (from KURV Studios) teaches you how to create some abstract art. Part 1 Part 2 Part 3 Part 4 Part 5 Part 6

Lightwave + Vue

Here are two tutorials that integrate Lightwave with Vue: Lightwave/Vue Data Exchange and Lightwave/Vue Surfaces.

IK Booster Free Training Series

These 11 sessions were made to show you what IK Booster, a free tool in Lightwave, can do for you. Part 1 Part 2 Part 3 Part 4 Part 5 Part 6 Part 7 Part 8 Part 9 Part 10 Part 11

Light Array

Learn how to create interesting lighting effects with LightArray.

Making Fireworks

Learn how to make fireworks in Lightwave in this 3 part tutorial: Part 1 Part 2 Part 3

Create a GSM Phone

Model and render a Sony Ericsson T610.

Create a Glass Bowl

Model and texture a glass bowl.

HDRI in Lightwave

Learn how to use HDRI effectively in Lightwave.

IK Chaining and Animating a Fish

Learn how to set up the IK chain and animation for a fish.

My Son Marcus

Watch Benoit Patterlini's project overview of modeling his son, along with some interesting attire.

Ocean Scene

Create a stormy ocean using displacement maps, surfacing, animation via control nulls, texturing, and fog.

Bevel a Coffee Mug

For beginners, this tut will show you how to use the bevel tool, knife tool, and the smoothshift tool on a real world example.

UV Mapping a Tobasco Box

Get some hands on basic UV mapping instruction...with the help of endomorph.

Red Peppers

Learn a simple medthod of modeling and texturing some red peppers.

Normal Mapping

Another one for the beginners...but this tut is on normal mapping.

Making Eyes

Model, UV, and texture some eyes, in this huge 5 part tutorial.

Desert Scene

Learn how to make a simple desert scene.

Working With the Hair System

Learn to work with hair and fiber in Lightwave.

The Box Car

Watch Chris Jennings' workflow, as he creates The Box Car.

Making of SimTech MTS.Arach

Follow the making of this insane robot looking creature from Dave Wilson.

Nature of Man

Check out this project overview, with the modeling done in Lightwave, and the rest done in Photoshop and FPrime.

Modeling a 350-Z

Look at this huge 25 page tutorial on modeling a Nissan 350-Z, for artists of a beginner to intermediate skill level.

Animated Snow Trails

Learn a technique to create displaced trails in the snow.

Integrating 2D and 3D Objects/Environments

Just like the title says, you will be integrating 3D objects into 2D environments within Lightwave.

Making of Left Behind

Using Lightwave and Photoshop, follow Roman Kessler through his process in creating Left Behind.

Making of All Road

Watch Neil MacCormack's process in creating this futuristic off-road/all-road vehicle.

Procedural Texturing with Weight Maps

Through the creation of a large anvil, this tutorial attempts to show some techniques used to create realistic surfaces.

Modeling a WOW Orc

In Eric Williams' first tutorial, he teaches you how to model and texture a World of Warcraft Orc.
If you enjoyed this post, please ReTweet to say thanks..!